1、业务背景
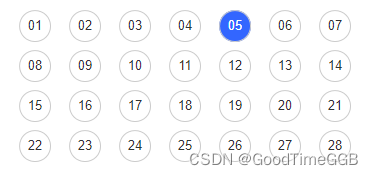
还款业务,设置每月还款日,选每月几号扣款,不需要29、30、31,因为不是每个月都有这三天的
2、预期效果图
3、代码实现
3.1 初始化vue项目
地址:https://cn.vuejs.org/guide/introduction.html
3.2 在项目中应用elementUI
地址:https://element.eleme.io/#/zh-CN/component/installation
3.3 在main.js中引用
1
2
3
4
5
6
7
8
9
10
11
12
13
14
| import Vue from 'vue'
import ElementUI from 'element-ui'
import 'element-ui/lib/theme-chalk/index.css'
import App from './App'
import router from './router'
Vue.use(ElementUI)
new Vue({
el: '#app',
router,
components: { App },
template: '<App/>'
})
|
3.4 编写字母按钮组件(完整代码在最后)
1
2
3
4
5
6
7
8
9
10
11
12
| <template>
<div class='box'>
<span
class='inner'
@click='selectClick(index, item)'
:class="'list_'+index"
v-for='(item, index) in numberArr'
:key='index'
>{{ item }}</span
>
</div>
</template>
|
3.5 引用字母按钮组件(完整代码在最后)
1
2
3
4
5
6
7
8
9
10
11
12
13
| <template>
<div id="app">
<button @click="handleNumberClick">点击调用获取还款日组件方法</button>
<el-dialog
title="设置还款日"
append-to-body
:visible.sync="showDialog"
width="350px">
<number-select ref="numberSelect" :showDialog="showDialog" @hideModal="hideModal" />
</el-dialog>
<div>设置还款日期为{{this.sendNum}}</div>
</div>
</template>
|
4、实际效果图
5、完整代码
5.1 设置还款日组件页面 NumberSelect.vue
1
2
3
4
5
6
7
8
9
10
11
12
13
14
15
16
17
18
19
20
21
22
23
24
25
26
27
28
29
30
31
32
33
34
35
36
37
38
39
40
41
42
43
44
45
46
47
48
49
50
51
52
53
54
55
56
57
58
59
60
61
62
63
64
65
66
67
68
69
70
71
72
73
74
75
76
77
78
79
80
81
82
83
|
<template>
  <div class='box'>
    <span
      class='inner'
      @click='selectClick(index, item)'
      :class="'list_'+index"
      v-for='(item, index) in numberArr'
      :key='index'
      >{{ item }}</span
    >
  </div>
</template>
<script>
export default {
props: {
sendNumber: Number,
showDialog: {
type: Boolean,
default: false,
required: true
}
},
name: 'numberSelect',
data () {
return {
numberArr: [],
index: 0
}
},
methods: {
selectClick (idx, item) {
this.sendNum = item
var len = this.numberArr.length
for (var i = 0; i < len; i++) {
if (i === idx) {
document.getElementsByClassName(
'list_' + i
)[0].style.backgroundColor = 'skyblue'
} else {
document.getElementsByClassName(
'list_' + i
)[0].style.backgroundColor = ''
}
}
this.$emit('hideModal')
}
},
created () {
for (var i = 1; i <= 28; i++) {
this.numberArr.push(i)
}
}
}
</script>
<style>
.box {
margin: 0 auto;
background-color: #fff;
width: 300px;
height: 240px;
display: flex;
flex-wrap: wrap;
}
.inner {
margin-left: 10px;
margin-top: 10px;
text-align: center;
line-height: 30px;
width: 30px;
height: 30px;
border: 1px solid #000;
border-radius: 50%;
background-color: #fff;
display: inline-block;
cursor: pointer;
}
</style>
|
5.2 设置还款日组件页面 NumberSelect.vue
1
2
3
4
5
6
7
8
9
10
11
12
13
14
15
16
17
18
19
20
21
22
23
24
25
26
27
28
29
30
31
32
33
34
35
36
37
38
39
40
41
42
43
44
45
46
47
48
49
50
51
| <template>
<div id="app">
<button @click="handleNumberClick">点击调用获取还款日组件方法</button>
<el-dialog
title="设置还款日"
append-to-body
:visible.sync="showDialog"
width="350px">
<number-select ref="numberSelect" :showDialog="showDialog" @hideModal="hideModal" />
</el-dialog>
<div>设置还款日期为{{this.sendNum}}</div>
</div>
</template>
<script>
import NumberSelect from './components/NumberSelect.vue'
export default {
components: { NumberSelect },
name: 'App',
data () {
return {
showDialog: false,
sendNum: 0
}
},
methods: {
handleNumberClick () {
this.showDialog = true
},
hideModal () {
this.showDialog = false
console.log('确认的数字为:' + this.$refs.numberSelect.sendNum)
this.sendNum = this.$refs.numberSelect.sendNum
}
}
}
</script>
<style>
#app {
font-family: 'Avenir', Helvetica, Arial, sans-serif;
-webkit-font-smoothing: antialiased;
-moz-osx-font-smoothing: grayscale;
text-align: center;
color: #2c3e50;
margin-top: 60px;
}
</style>
|
若本文有帮助到阅读本文的同学,欢迎点赞、关注、收藏,互相学习交流。